
Side-Car container A Pod is composed of one or more application containers. A sidecar container is a utility container and its purpose is ...

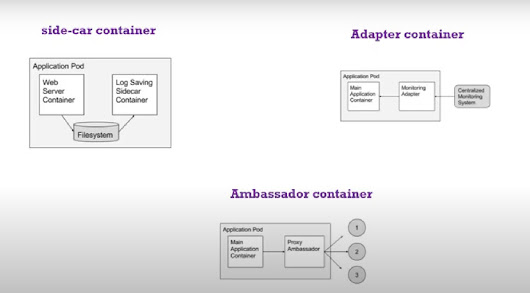
Side-Car container
A Pod is composed of one or more application containers. A sidecar container is a utility container and its purpose is to support the main container.
It is important to note that a standalone sidecar does not serve any purpose, it must be paired with one or more containers.
Generally, a sidecar container is reusable and can be paired with numerous type of main containers.
Example
Create a Pod that defines the main application container that writes the current date to a log file every five seconds.
The sidecar container is nginx serving that logfile. (In practice, your sidecar is likely to be a log collection container that uploads to external storage.
Let's create a file called pod.yaml
Execute the file
kubectl apply -f pod.yaml
Connect to the sidecar pod
kubectl exec pod-with-sidecar -c sidecar-container -it bash
Install curl on the sidecar
apt-get update && apt-get install curl
Access the log file via the sidecar
curl 'http://localhost:80/app.txt'
Adapter Container
It is a container that transforms main application data in such a way that it should be understood by an end system means it is used for data transformation.
For example, you are running pods with microservices that are to be monitored by a monitoring tool like Prometheus, but microservices are developed in different programming languages and these are generating data in different formats so in this case, we can apply an Adapter pattern to transform data which would be understood by Prometheus

Example
Create a Config Map which overwrites the default website of Nginx, lets call the file name configmap.yaml
Create a Pod that implements the Adapter pattern to transform the data so that we can feed it to Prometheus. Let's have filename as adapter.yaml
To access the application let's have a service.yaml file
Execute
kubectl apply -f .
kubectl exec -it webserver bash
apt update && apt install curl -y
curl localhost/nginx_status
curl localhost:9113/metrics
Ambassador Container
The Ambassador container is a special type of sidecar container which simplifies accessing services outside the Pod. When you are running applications on kubernetes it’s a high chance that you should access the data from the external services. The Ambassador container hides the complexity and provides the uniform interface to access these external services.
Imagine that you have the pod with one container running successfully but, you need to access external services. But, these external services are dynamic in nature or difficult to access. Sometimes there is a different format that external service returns. There are some other reasons as well and you don’t want to handle this complexity in the main container. So, we use the Ambassador containers to handle these kinds of scenarios
Example
Microservice for this example:-Fake API
Ambassador Container
Let’s look at the Ambassador container which is a simple NGINX server that acts as a reverse proxy. Here is the simple nginx.conf file.
Create a Docker file
Create a Docker image and push it to docker hub
docker build -t nginx-server-proxy .
docker tag nginx-server-proxy ramansharma95/nginx-server-proxy
docker push ramansharma95/nginx-server-proxy
Main Container
The main container is the nodejs express server that serves on the port 9000. This server calls the reverse proxy and this proxy intern calls the actual API. Here is the server.js file.
Let's create files which are required for nodejs app
package.json
package-lock.json
server.js
Docker file
Execute below commands
docker build -t main-container .
docker tag main-container ramansharma95/main-container
docker push ramansharma95/main-container
Create Pod(pod.yaml)
Execute


COMMENTS