
Self-hosted agents An agent that you set up and manage on your own to run jobs is a self-hosted agent. You can use self-hosted agents in Az...
Self-hosted agents
An agent that you set up and manage on your own to run jobs is a self-hosted agent. You can use self-hosted agents in Azure Pipelines or Azure DevOps Server, formerly named Team Foundation Server (TFS). Self-hosted agents give you more control to install dependent software needed for your builds and deployments. Also, machine-level caches and configurations persist from run to run, which can boost speed.
You can install the agent on different OS. There are different agents on different OS
- macOS agent
- Linux agent (x64, ARM, ARM64, RHEL6)
- Windows agent (x64, x86)
- Docker agent
Self-hosted Windows agents
Prerequisites
- Windows 7 SP1 ESU, 8.1, 10, or 11 (if using a client OS)
- Windows 2012 or higher (if using a server OS)
- PowerShell 3.0 or higher
- .NET Framework 4.6.2 or higher
Authenticate with a personal access token (PAT)
- Sign in with the user account you plan to use in your Azure DevOps organization (
https://dev.azure.com/{your_organization}).
From your home page, open your user settings, and then select Personal access tokens.
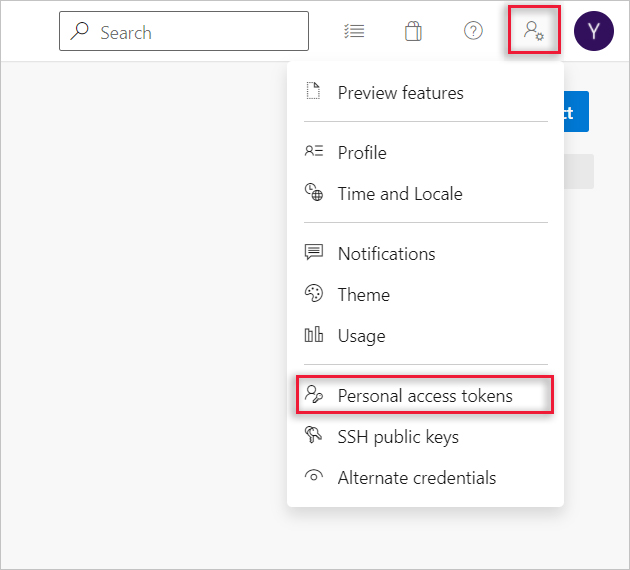
Create a personal access token.
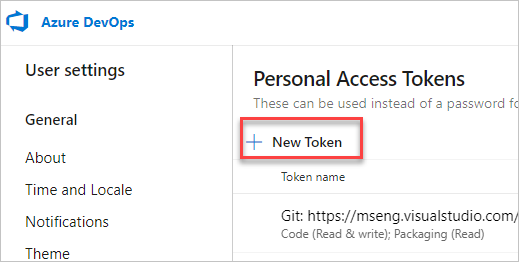
For the scope select Agent Pools (read, manage) and make sure all the other boxes are cleared. If it's a deployment group agent, for the scope select Deployment group (read, manage) and make sure all the other boxes are cleared.
Select Show all scopes at the bottom of the Create a new personal access token window window to see the complete list of scopes.
Copy the token. You'll use this token when you configure the agent.
Confirm the user has permission
Make sure the user account that you're going to use has permission to register the agent.
Is the user an Azure DevOps organization owner or TFS or Azure DevOps Server administrator? Stop here, you have permission.
Otherwise:
Open a browser and navigate to the Agent pools tab for your Azure Pipelines organization or Azure DevOps Server or TFS server:
Choose Azure DevOps, Organization settings.
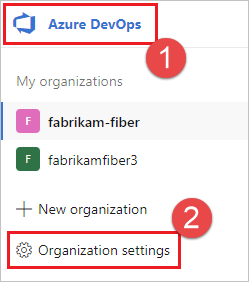
Choose Agent pools.
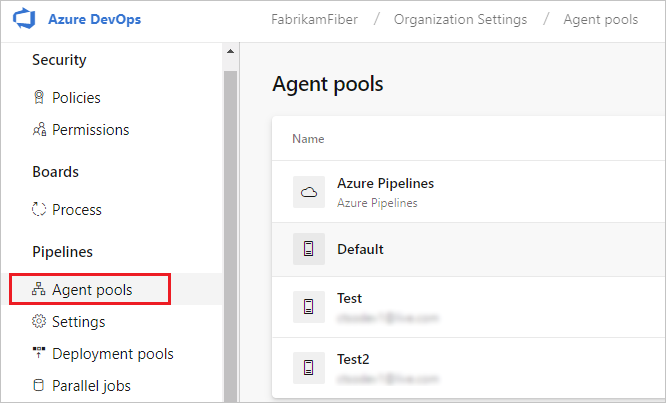
Azure pipeline Agent pool is used for MS-hosted agents and Default is used for self-hosted agents.
Click on Default and then click on the New Agent button.
It will open the set of instructions to Download Agent and install agent so follow those instructions and install the agent on a windows machine.
Server URL:- Enter URL for Organization like https://dev.azure.com/myrepo321
PAT:- Personal Access Token which is created in user profile.
Agen Pool:- Default
Agent Name:- provide any valid name or press enter for default name
Work folder:- Press Enter or you can provide any folder where you want to keep the artifacts.
Enter run agent as a service:- Press Enter for N if you want to run as a windows service then you can choose Y.
Enter Configure Autologon and Run agent on Startup: Press Enter for N and Y for yes.
Under this folder run the command .\run.cmd
Check Agent pool --> Default Pool and you will find the Agent is created and has Online Status.
Create a new pipeline or Edit any existing pipeline by providing the below code. In this example, RAMAN-SHARMA is the agent which is created in the Default Agent pool. After writing the code Run the pipeline (It will ask the permission to allow the user to execute the pipeline, so provide the permission by clicking on the Permit button)
# Build and test ASP.NET Core projects targeting the full .NET Framework.# Add steps that publish symbols, save build artifacts, and more:# https://docs.microsoft.com/azure/devops/pipelines/languages/dotnet-coretrigger:- master#Define the Agent pool configuration here. RAMAN-SHARMA is agent Namepool:name: 'Default'vmImage: 'RAMAN-SHARMA'variables:solution: '**/*.sln'buildPlatform: 'Any CPU'buildConfiguration: 'Release'steps:- task: NuGetToolInstaller@1- task: NuGetCommand@2inputs:restoreSolution: '$(solution)'- task: VSBuild@1inputs:solution: '$(solution)'msbuildArgs: '/p:DeployOnBuild=true /p:WebPublishMethod=Package /p:PackageAsSingleFile=true /p:SkipInvalidConfigurations=true /p:DesktopBuildPackageLocation="$(build.artifactStagingDirectory)\WebApp.zip" /p:DeployIisAppPath="Default Web Site"'platform: '$(buildPlatform)'configuration: '$(buildConfiguration)'Once the Job is executed successfully you will find the artifacts in the configured directory.


ExamsVCE 350-601 Exam Dumps offer a comprehensive collection of study materials designed to help candidates prepare for the Cisco CCNP Data Center and CCIE Data Center Core Technologies (DCCOR) certification exam. These 350-601 Exam Dumps typically include real exam questions, detailed answers, and explanations to ensure a thorough understanding of the topics. They are structured to align with the exam objectives, covering areas such as network automation, virtualization, infrastructure, security, and data center technologies.
ReplyDelete